針對先前的 webpack 相關設定,接續進行 vue 開發環境的安裝。
webpack 的 vue 環境安裝套件
–save-dev (開發環境) 套件
在 npm 安裝在 dev 環境下,使用到的 webpack 工具有
- vue-loader
- vue-template-compiler
- vue-html-loader
- vue-style-loader
1 2 3 4 | npm install vue-loader -D npm install vue-template-compiler -D npm install vue-html-loader -D npm install vue-style-loader -D |
在課程講義中是一個工具就列一個指令,這樣要輸入多行,而也可以一口回將所有工具透過一行指令完成。
1 | npm i vue-loader vue-template-compiler vue-html-loader vue-style-loader -D |
–save (生產環境) 套件
將 vue.js 實體,直接安裝於生產模式下,當 webpack 打包生產環境後,也就是執行指令時要完整的將框架封裝在模組內。
1 | npm install vue -S |
VScode 擴充 Vuter
開發 vue.js 的套件,Vuter 點按這裡
調整專案資料夾結構
在 src/ 資料夾下多開啟新資料夾 components,用來放置 .vue 檔。
將原本的注入點 entry src/js/index.js 檔,移動到 src/ 的資料夾下。
新增 vue.js 進入點檔案,同樣在 src/ 資料夾下多加入 App.vue 檔。

webpack.config.js 檔設定 vue-loader 與 Scss
vue 的開撥環境,主要就是以 webpack 用來編譯 .vue 檔,
引入 VueLoaderPlugin
透過 npm 將 vue 實體下載完成後,接著開啟 webpack.config.js 檔進行相關設定。
在 vue-cli 官方文件中,有介紹以 webpack 的方式使用 vue-loader
在 webpack.config.js 開頭處加上引入 vue-loader,方面的方式選一引入 vue-loader。
1 2 | var VueLoaderPlugin = require('vue-loader/lib/plugin'); // 課程引入方式 const { VueLoaderPlugin } = require('vue-loader'); // vue-loader 官方文件 JS 解構方式 |
加入 vue-loader 跟 vue-style-loader,移除 include 設定
因為要將 .vue 檔透過 webpack 進行編譯,接著在 webpack 裡的 module: { rules: [] } 的 loader 的部分,再多加入 .vue 的設定。
1 2 3 4 5 6 | { test: /\.(vue)$/, use: { loader: 'vue-loader', }, }, |
Scss 由 style-loader 改用 vue-style-loader
原本的 style-loader 就是將 css 注入到 webpack 的 JS 裡,但使用 vue 的方式是使用 vue-style-loader。
在 Scss 的部份修改後如下。
1 2 3 4 5 6 | { test: /\.(sass|scss)$/, use: ['vue-style-loader', 'css-loader', 'postcss-loader', 'sass-loader'], // include: path.resolve('src/scss'), // exclude: path.resolve('./node_modules'), }, |
include 與 exclude 不使用是因為,透過 .vue 檔中的 <style lang="scss" scoped></style> 中的 Scss,在透過 exclude: path.resolve('./node_modules') 不解析路徑與只有取用 Scss 路徑 include: path.resolve('src/scss') 的情形下,Scss 會在限定路徑的情形下執行到 .vue 檔中,解析 Scss 會無法處理 App.vue 檔中的 Scss。
透過 new VueLoaderPlugin 將 vue
在 webpack.config.js 最後方,在 plugins:[} 設定中加入前面引入的 VueLoaderPlugin,以新建構函式的方式透過 new VueLoaderPlugin(), 建立出新的建構函式。
1 2 3 | plugins:[ new VueLoaderPlugin(), ] |
Vue.js 於 index.js 注入點的設定
index.js 加入 vue 本體與 vue 注入點 App.vue 檔的設定
在注入點 index.js 檔中加入以下設定
1 2 3 | import Vue from 'vue'; import App from 'App.vue'; import 'index.scss'; |
- import Vue from 'vue';:為 vue 的本體
- import App from 'App.vue';: App.vue 注入點的設定。
- import 'index.scss';:透過 index.js 注入點最後由 vue-style-loader 將 Scss 由 JS 把樣式注入畫面
以上完成接著加入就是注入點 index.js 後方加入實體操作 DOM 元素的對象。
1 2 3 4 | new Vue({ el: '#app', render: (h) => h(App), }); |
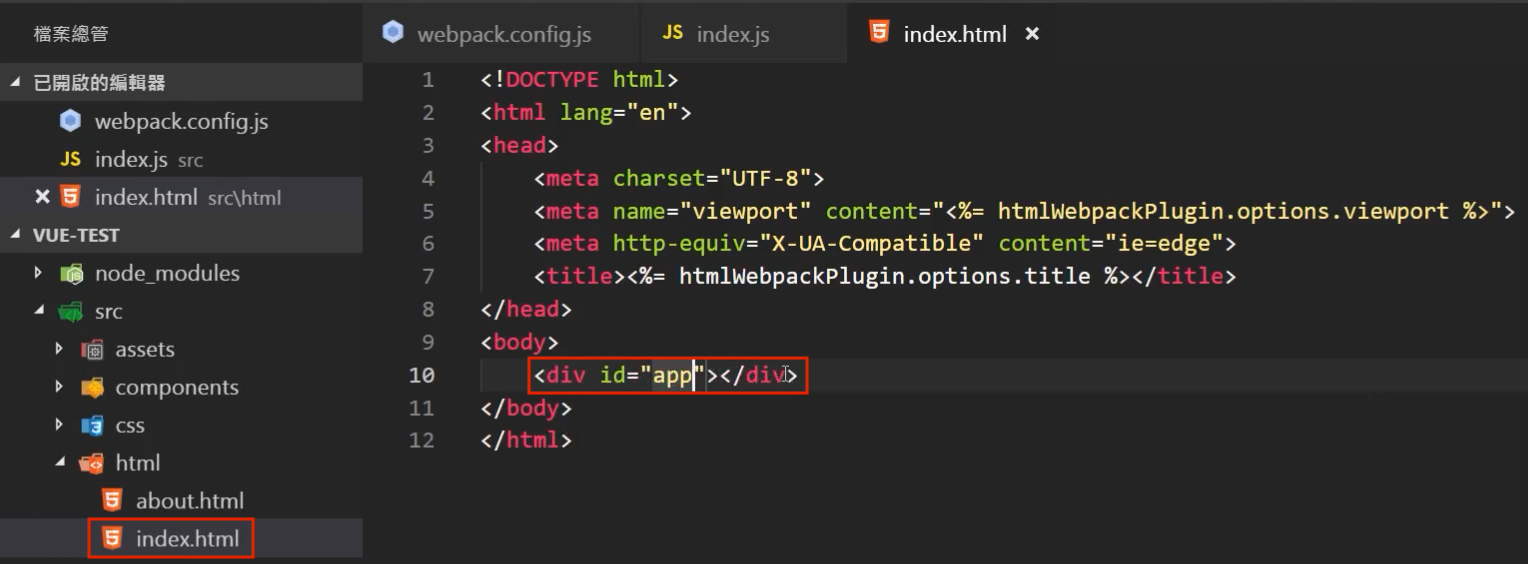
index.html 檔中指定 #app 為 vue.js 實體操作 DOM 元素對象
在轉換 HTML 樣版的設定,需要先確任注入點的 index.js 檔,有沒有由 new HtmlWebpackPlugin({}) 的 chunks: ['vendor', 'index'], 設定中有引入 index.js 於主要的 index.html 一頁式 SPA 的頁面中。
在 index.html 檔中,透過 vue.js 本體產生實體的動態操作 DOM 元素。
接著前往 index.html 在 HTML 結構中加入綁定元素 #app 在 <body></body> 之間。

設定 vue.js 注入點 App.vue 檔
在 App.vue 的注入點,主要以 vue 三個處理部份 <script>、 <template>、 <style lang="scss" scoped> 為主,
1 2 3 4 5 6 7 8 9 10 11 12 13 14 15 16 17 18 19 20 21 | <script> export default { data() { return { text: 'vue index test' }; }, }; </script> <template> <div id="app"> <h1>{{ text }}</h1> </div> </template> <style lang="scss" scoped> #app { display: flex; } </style> |
以上設定都完成後,輸入指令 npm run dev 啟動 webpack-dev-server 開啟瀏覽器,畫面上出現在 App.vue 檔中的 data 的 {{ text }} 變數,印出在畫面上的話,這就表示成功將 vue.js 透過 webpack 整合執行編譯。


